If you are not able to remove the USB receiver using just a two-finger pinch, you are not alone. There is only a couple of millimeters of grip so using a pry tool of some sort was necessary. I used a finger on the inside and on the outside (left-side) I used a plastic pry-tool where the plastic and metal meet in order to shimmy the receiver out.
If you are wondering why there is a USB extension cable included, it is to allow you to close the gap between the receiver and your mouse to within the recommended 20 centimeters. This is not required but there is probably a reason you bought this mouse and it's not just because it was recommended as the budget pick on Wirecutter.
You will probably wonder why installing the receiver (plugging in the mouse) causes you non-Apple keyboard to need to be re-registered.
Does your mouse pointer crawl across the screen? This is because the DPI (dots-per-inch) setting defaults to the maximum of 400 DPI. Push the square button below the scroll wheel to toggle between 400, 800, 1600, and 3200 DPI sensitivities. Try different settings until you're comfortable.
You may also wonder whether you need to install software for the mouse. I recommend that you do to customize the hotkeys. If you do not have the "Logitech Gaming Software" already installed, you will need to install it as software for other Logitech mice like Logi Options" do not work with this mouse.
During installation, you will need to grant lots of special permissions like "Input Monitoring" and installing deprecated system extensions which will both require to you to authorize via System Preferences. Upon allowing these elevated permissions, it will look like your installer hangs but if you give it a couple of minutes it will complete and require you to restart your computer.
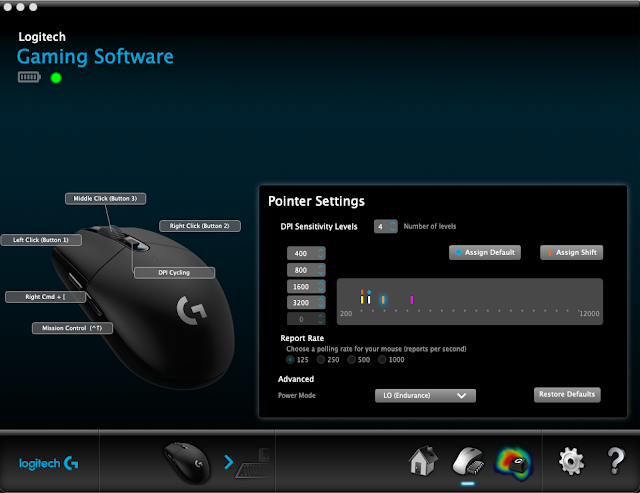
When you start the "Logitech Gaming Software" app for the first time, you might be shown a demo of Logitech's latest gaming tech innovation. Do your best to skip or go through it to the main screen of the app and look for a mouse icon in the bottom left of the window because the customization defaults to the "Applets" screen where "Screen Sampler" was highlighted for me. Then, click the icon with a gear next to a mouse pointer as shown at the center right of the screen.
Once you see a mouse with flyovers indicating each button, right click on one pointing to the button you want to customize and click "Assign New Command". Click on "Keystroke" if it's not already highlighted and look for your desired function. If you don't see it, enter your keyboard shortcut into the text field and then press OK to save it.
The "Logitech Gaming Software" gives you great control over customizing the buttons but it is less friendly to macOS users compared to "Logi Options". There are "Forward" and "Back" buttons on the left side of this mouse, but if you are like me, you will rarely use the forward button and may want to map the "forward" button to trigger "back" and have the back button do something else. I recommend something from the following list.
- Exposé is Control+Down Arrow (^↑)
- Mission Control is Control+Up Arrow (^↓)
- Switching between desktops is Control+Left Arrow (^←) and Control+Right Arrow (^→).
Here's a screenshot of how my mouse is set up.


